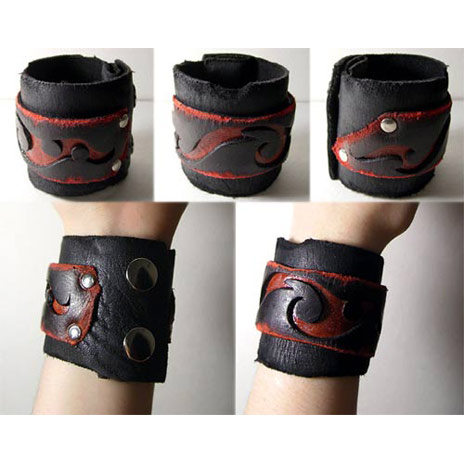
How I made this leather wrist band.
It started with a quick sketch that had a nice fluid 'wave' shape, and added and subtracted little bits here and there to give it a bit of a 'fire flame', reminiscent of some freestyle tribal designs I've seen. The leather was from a large bag of leather scraps from my local craft store. The base cuff was a long rectangle roughly cut from thick, black cow hide. It had a tough quality with a slightly rough texture on the outside. The red and black design section was actually two pieces of leather; one thick piece of ox-blood coloured cow hide, and one slightly smaller, thin piece of red-dyed pig hide. The design was cut into and then carved carefully out of the ox-blood leather and the edges were carved to have a rough roundness.
All of the outer edges were then painted/dyed the same red as the pig hide using red pigment ink mixed with red acrylic paint and Elmer's glue to help bind it with the leather. The top surface of the ox-blood section was then dyed black using a leather boot touch up dye with black pigment ink. I scrubbed the surface thoroughly first and used a super fine sandpaper to help lift off any waxes from the its original treatment. Then I painted the ink-dye mix over the surface and inner edges of the design, I made sure not to paint over the red outer edges. I let it dry and then repeated this process until it was a rich black, with no transparencies showing through.
After the design section was finished drying, I glued the smaller pig hide piece, face up, to the underside of the ox-blood piece; so the red of the pig hide leather showed through the cut out area from the design. I glued this with Elmer's glue after sanding and cleaning edges that wouldn't be visible at the edges of the design when placed under the ox-blood leather.
Whilst the glue was setting I shaped a curve in the leathers as if they were sitting on the cuff already, and smoothed the softer pig hide to follow the thicker ox-blood without any bumps along the inside and then wrapped them in place around a soda can to allow to dry using a couple of rubber bands (the rubber bands were not tight enough to create any indentations in the edges of the design or the leather in general- just tight enough to hold the leather in place as it dried in this curved shape around the can).
In the meantime, I plotted holes for two button snaps along the ends of the base cuff (if you buy a little pack of button snaps at your local store, the pack should come with some simple instruction on the back). I used a leather punch to punch out the four holes (two at each end of the cuff) and then hammered the snaps into place.
After that, I wrapped the design section around the base cuff and used a bead reamer to carefully(!) poke holes in the areas where rivets (also available in craft stores and come with simple instructions) would hold the leathers together securely - I made sure the button snaps were snapped shut whilst plotting the punch points so that the rivets would sit in a good place to pull the design tight against the cuff, but not so tight as to not be able to bend the cuff to close it around your wrist; this leather was pretty thick and I didn't want the rivets to pop free from too much pressure or to risk damaging the design piece.
When the holes were plotted, I unsnapped the cuff and punched through the two sections of leather individually. I placed four rivets in my design: two on the left and two on the right. I set two into one side first (and this is where it could get tricky to explain) and then bended the design section outwards to accommodate the curve whilst setting the second two rivets and hammering them into place. The leather band was then complete with a fixed curve, ready to wear.

LongLongCat
Hey Texas lady. *wink *wink
CosmicDeath
Hey (unknown location) sir. *nudge *nudge